Facebook has always been a large name in the social media industry, which is not an easy feat to accomplish. Its popularity has only increased after its WhatsApp and Instagram acquisitions and the establishment of the Meta Group of Companies. However, popularity isn’t everything, and Facebook is a great example. Although Facebook has nearly three billion monthly active users, it’s still not the best in the business. Instagram is much higher in terms of modernity, utility, and quality.
Facebook is largely populated by Boomers, who find the Facebook’s app never changing the interface to be a plus point. There are no new features or trends on Facebook, and this is a great thing for your grandparents, but Gen Z is accustomed to change rather than monotony.
In comparison, take a look at Instagram and Snapchat. Both platforms have the highest number of Gen Z users, and they have one thing in common: Unique Selling Points that they regularly expand on.
Snapchat is a completely different platform; everything about it is unique because there isn’t another like it. On the other hand, Instagram has many competitors but still manages to stay on top of trends, controversies, and exciting updates.
Another thing both these platforms agree on is giving the users what they want, but not exactly like that. There’ll always be one group of users asking for sometimes unreasonable but always unnecessary features. It’s vital to deal with such requests delicately; they define the platform’s relationship with the users.
For example, when Snapchat was asked for a feature to save snaps, it was a decision that went against the concept of Snapchat. But they made it work by adding it as an optional feature. There are several instances of such clever decisions throughout all social media platforms.
Facebook, however, seems to have given up on platform development. Well, thankfully, it has already amassed quite a large and loyal user base, so it looks like it might work for it after all.
Today’s blog will discuss how you can see your login history on Facebook.
How to See Login History on Facebook
Social media platforms consistently work to make our experience easier and more convenient. One of the features recently introduced with this purpose coincides with our topic today.
How to see login history on Facebook? The answer to this question is simple; check out your Facebook Activity log. Don’t worry; we’re aware that you’re only here because you didn’t know about this feature. So, we don’t expect you to be able to find it on your own.
Here’s how to check out your Activity log on Facebook
Step 1: Open Facebook on your phone.
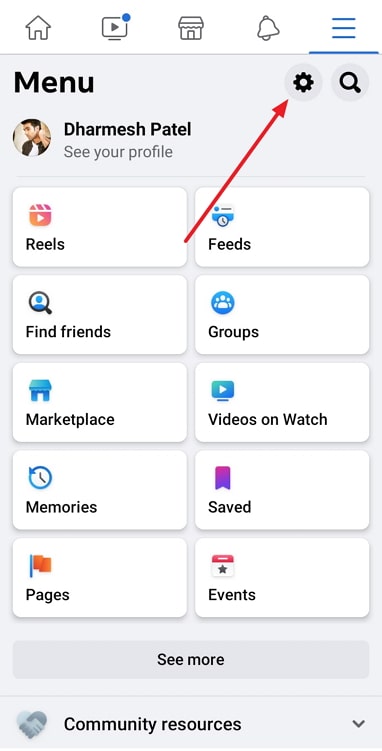
Step 2: You’ll see your Facebook Timeline first. Tap on the hamburger icon tab to go to Menu.

Step 3: Directly adjacent to the Menu, you’ll see the gear icon for Settings; tap on it. Scroll down to the Your information section.
Step 4: Tap on the first option there, Activity log. Again, scroll down to the bottom and tap on Logged Actions and other activity. Tap on the View Logged Actions button under it.
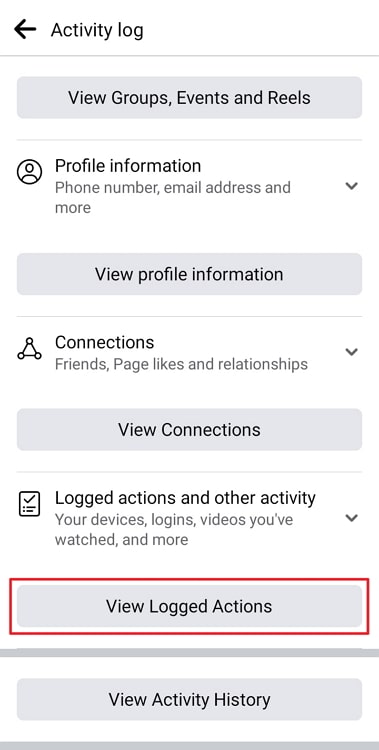
There you go! Now you can see all your past logins to this Facebook account.
If you’re an avid Facebook user, almost to an unhealthy extent, we understand how hard social media addiction is. However, this doesn’t mean you need to give up. Your time is important, and there’s absolutely no value in scrolling through Facebook all day long.
The best and easiest way to get over this addiction is to remove all triggers. Simply put, delete/uninstall/deactivate all social media. We know this might sound extreme, but it isn’t. If you’re already addicted, you cannot take yourself at face value when you think you’ll stop overusing the internet.
Extreme measures are important for you, and an internet problem must be eliminated as quickly as possible. This is because it creeps onto you without you even realizing it. One day, you’re just checking out this new feature Facebook has; the next, you’re a serial Facebook scroller.
Don’t worry; now that we’re here, we promise you’ll be out of this in no time if you follow our directions.
Here’s how to deactivate your Facebook account
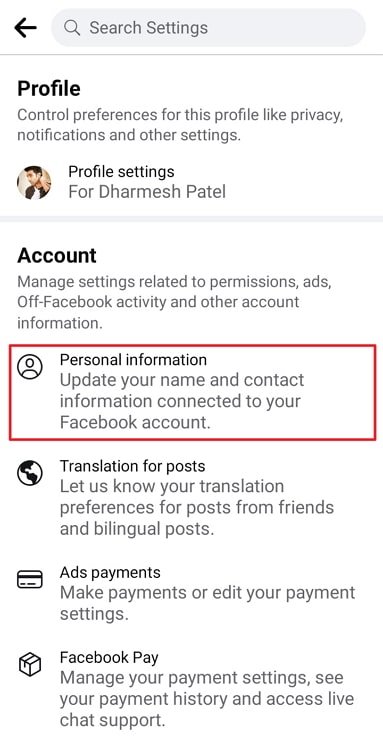
Step 1: Return to the Settings page and tap on the option at the top of the page called Personal and account information.
Step 2: Tap on the last option on the next page, Account ownership and control. On the next page, there’s only one option: Deactivation and deletion. Tap on that.
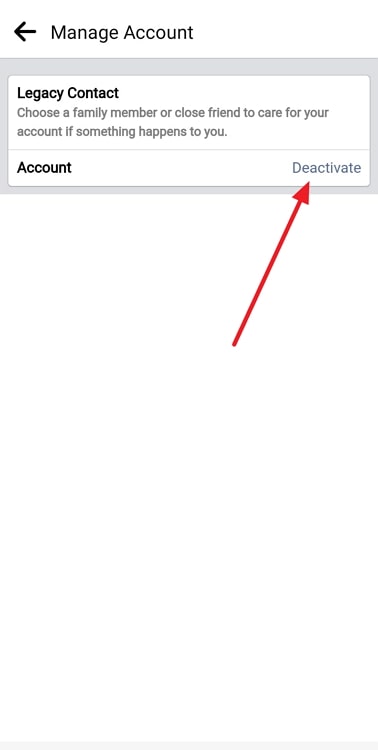
Step 3: Here, you’ll be explained how deleting and deactivating your account works. Tap the first option, then the blue button that says Continue to account deactivation.
Note: Bear in mind that a temporary action such as this is tempting fate. Use this only as a starting point and when you feel like it isn’t enough, delete your account without a moment of hesitation.
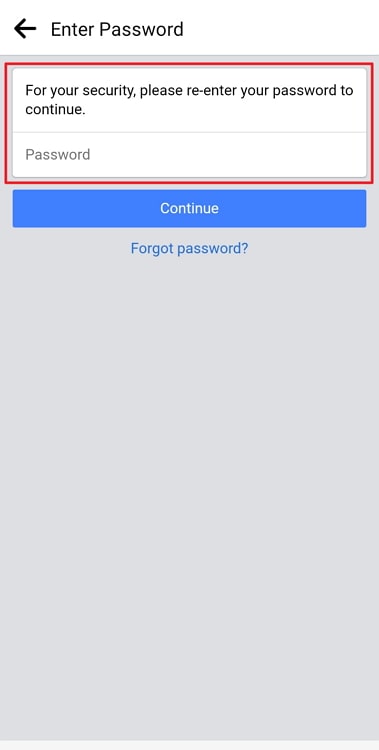
Step 4: Enter your password, tap Continue, and you’re ready!
We hope you achieve what you set out to do.
In the end
As our blog has now reached its end, let’s recap what we’ve talked about.
Facebook has features intended to make our lives more convenient. It would not have been possible to see all your past logins to a Facebook account seven years ago, but it certainly is now.
Going to your Activity log on Facebook is quite simple, but we’ve guided you through the process nonetheless. We’ve also discussed how problematic a social media addiction is and how it can cause you to waste valuable time.
If you wish to give up on Facebook for your mental peace and health, we’re here to help you. Follow our simple step-by-step guide to deactivating or deleting your Facebook account.
If this blog has left you with any more doubts, don’t hesitate to ask us in the comments; we’ll help you to the best of our abilities!
Also Read:




 Bitcoin
  Ethereum
  Tether
  XRP
XRP  Solana
  USDC
USDC  Dogecoin
  TRON
TRON  Cardano