Blog: a term that was coined to define e-journaling of sorts. When blogging was relatively new to the market, most people used it to maintain a record of their thoughts, musings, and experiences online, somewhat like a diary entry. However, that’s not what blogs are limited to anymore.
Today, people create blogs in diverse niches such as traveling, cooking, books, adventure, sports, fashion, art, and any other stream you could possibly imagine. In fact, it is the success of personal blogging that has influenced all the giant businesses and celebrities to add a blog on their websites.
This might come as a surprise to you, but statistics indicate that over 7 million blogs are published online in a single day. And the creators behind these blogs aren’t doing half bad for themselves. It wouldn’t be untrue to say that blogging has opened up endless career opportunities in the field of writing in general.
Now, let’s talk about the platforms for blogging. While some successful creators have gotten their own websites designed for blogging, the rest of them generally take to WordPress for the same. And it makes sense because WordPress is not only free to use but also has a large collection of tools and customization options to make your blog stand out. What else could one ask for? Well, there’s another alternative at your disposal: social media.
The topic of our discussion today is one such social media platform where blogging is quite popular: Instagram. If you’re a fresher wishing to create a personal blog on Instagram, stick with us till the end to earn our pearls of wisdom about the same and to learn how you can change your private Instagram account into a personal blog.
Personal blogging on Instagram: Everything you need to know about it
Blogging on social media platforms, which is also referred to as microblogging, is all the hype today. While users practiced blogging on social media platforms for a long time, the trend gained significant popularity during the COVID-19 pandemic, when people found more time to appreciate creators for talking about things and experiences that shaped them. Mental wellness blogs, in particular, were much sought-after during the period.
Changing Your Instagram Account to Personal Blog: Here’s how that’s done
Before you move ahead with the switch, there’s something we’d like to address first: the concern of privacy. If you’ve been using a private account on Instagram so far, we must tell you that the switch you’re about to go through will change your life on social media forever. Once you lose the shield of privacy, everything you post, from your photos and reels to your stories, will be open to the public view. Anyone can like, share, save, and comment on your content. If this is something that seems terrifying to you, you should take some time to consider all its nuances of it.
However, if you’re okay with the consequences of this change and ready to move forward, here are the steps that will guide you to your destination:
Step 1: Launch the Instagram app from your phone’s menu grid.
Once the app opens, you’ll find yourself on the Home tab first. From here, navigate a tiny icon of your profile picture’s thumbnail towards the bottom-right corner of the screen, and tap on it.
Step 2: Doing so will take you to your Profile tab.
Here, look for a hamburger icon towards the top-right corner of the screen, next to the Create icon (with a + symbol drawn on it).
Tap on the hamburger icon when you find it.
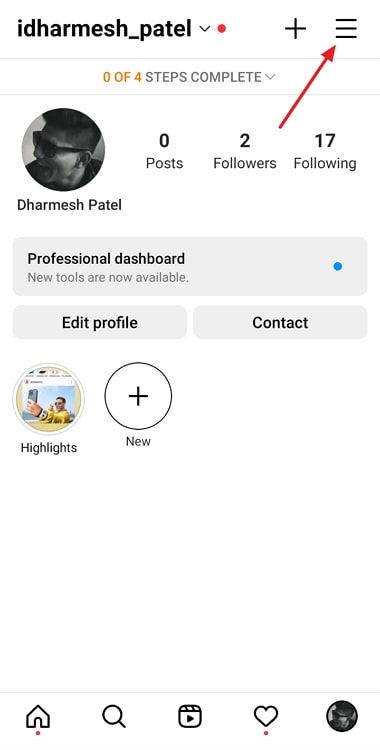
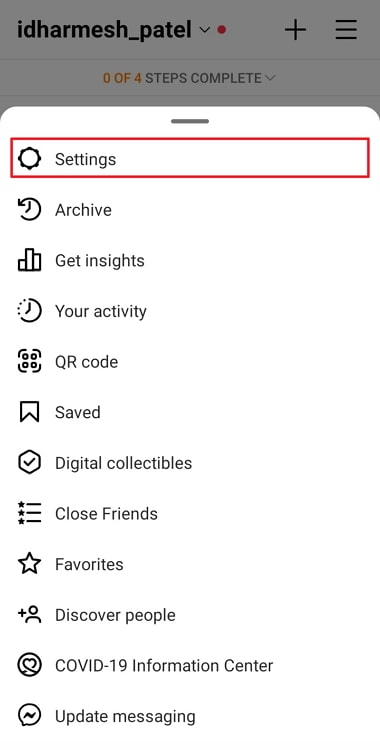
Step 3: As soon as you do, a window will scroll up your screen with a list of options like Settings, Your activity, and Archive on it.
Select the first option here, which is of Settings and has a cogwheel icon drawn next to it.
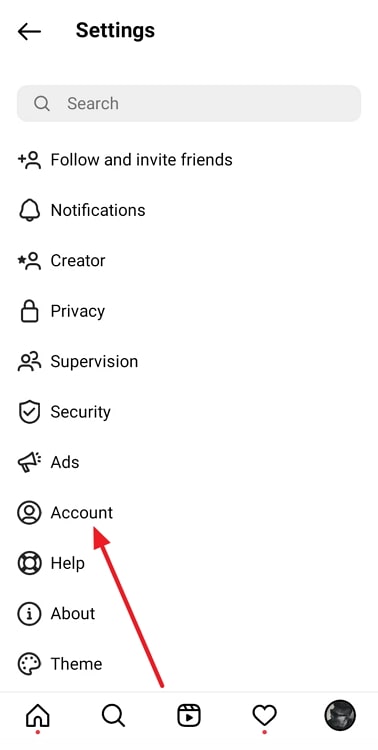
Step 4: You’ll find yourself on the Settings tab next, with another list of options. The sixth option on this list is of Account; tap on it to go to your Account tab.
Step 5: You’ll find a number of options mentioned in black letters on the Account tab. Scroll through these options all the way to the bottom of the screen.
In the end, you’ll find two options written in blue:
Switch to Professional account and Add a new professional account.
Tap on the first option here.
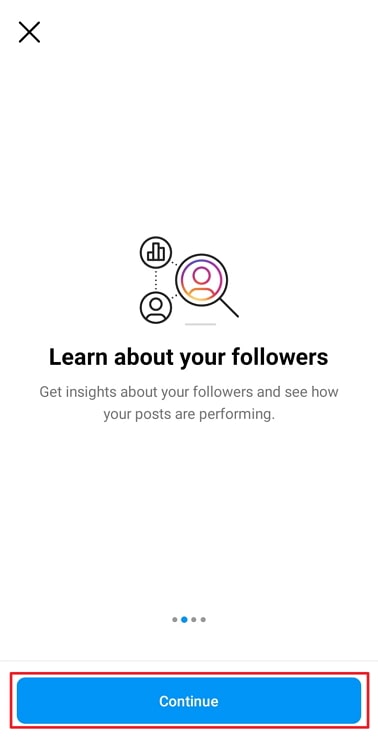
Step 6: Upon doing so, you’ll be shown a slideshow of sorts explaining the advantages of a professional account, such as learning about your followers, reaching more people, and getting new contact options.
You’ll also notice a blue Continue button at the bottom; tap on this button to move forward with the switch.
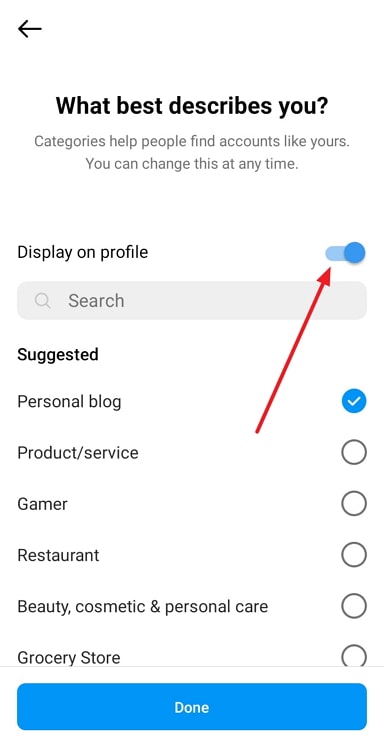
Step 7: On the next tab that you’re taken to, you’ll find this question on the top: What best describes you?
Following this question, you’ll find a long list of options to select from, such as Artist, Editor, Photographer, and Gamer.
You need to find Personal blog on this list, which you can do either by scrolling by all the options or simply typing it in the search bar given above the options.
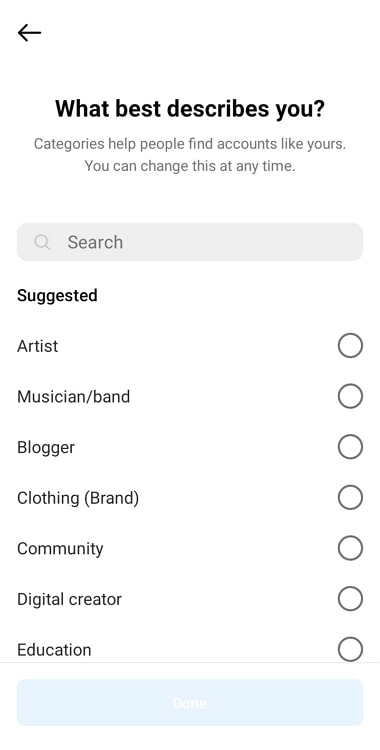
Step 8: Once you find and select Personal blog, your job is half done.
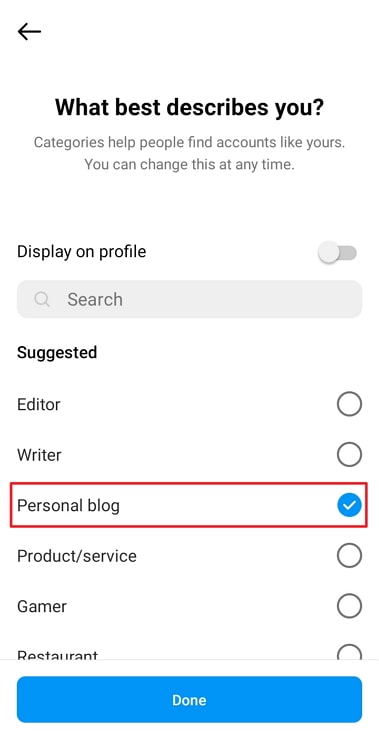
Now, you need to add the visibility of Personal blog on your profile. Right under the What best describes you? question, you’ll find this option with a toggle switch next to it.
This switch is turned off by default; you need to turn it on.
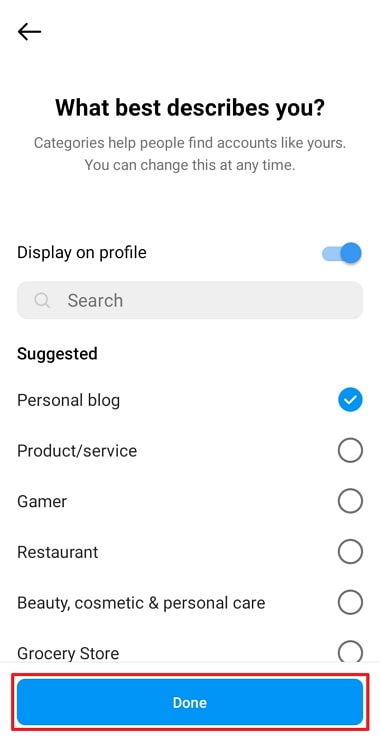
Step 9: When done, tap on the blue Done button at the bottom of your screen. You’ll see a dialogue box on the screen next, asking to confirm your action. Tap on OK, and your personal blog is ready to use!
Switching back to your private account: A step-by-step guide
We hope you enjoy working on your personal blog on Instagram. However, we’d love for you to be prepared for everything. So, in case the change to a public account is not to your liking, keep in mind that you can switch back anytime. The method to do so lies within your mobile app itself, and we’ll be happy to guide you through it.
Because the first part of this process is similar to the last one, we’d ask you to follow steps 1-5 from above and then continue to these steps:
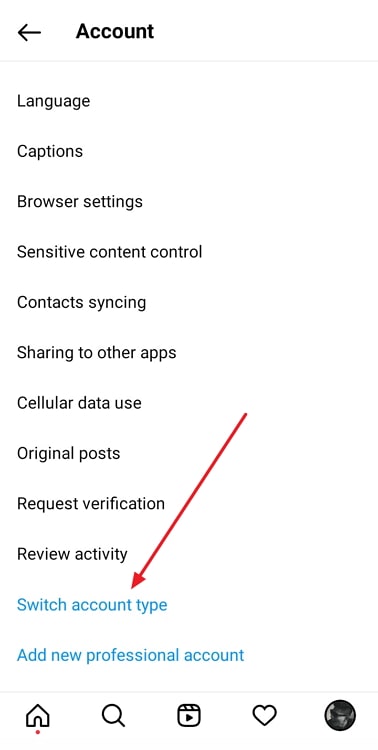
Step 6: When you scroll to the bottom of your Account tab, you’ll find these two options written in blue letters:
Switch account type
Add new professional account
Tap on the first option here.

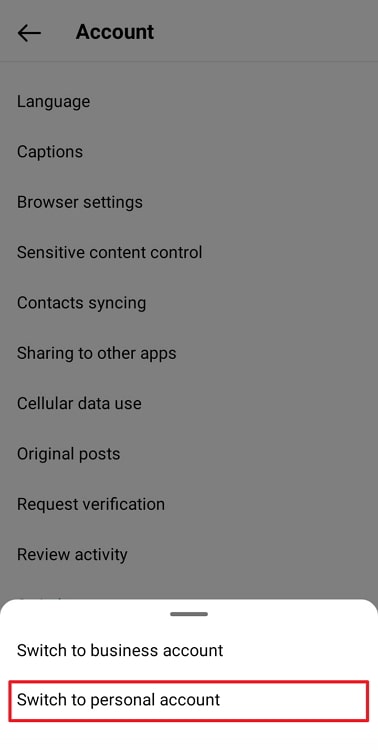
Step 7: When you do, a pop-up window will appear on your screen, asking you to choose between:
Switch to Personal Account
Switch to Business Account
When you select the first option here, you’ll be asked to confirm your action. Once you move ahead with it, your account will be changed back to private.
Also Read:


 Bitcoin
  Ethereum
  Tether
  XRP
XRP  Solana
  USDC
USDC  Dogecoin
  Cardano
  TRON
TRON