Instagram is a platform that’s getting even livelier, more colorful by the day. This visual-centric platform, where photos were highly popular at the time, has evolved to be home to countless videos as well. Be it as a part of a dump, on a story, or a reel; videos are all the hype on Instagram today. It’s natural that videos can capture much more than still photos, whether you’re trying to show off your holiday destination, capture a sunset, or prank your friends. However, the limitation of data usage stopped many factions from uploading videos freely in the last decade.
But now that no such restriction is relevant, more and more users are relying on videos to enhance their profiles and document their journeys better. If you’re one of these users, then congratulations! You’re already making the most of your profile on Instagram.
Here’s a query many video uploaders on Instagram, just like yourself, have been asking us for some time: Why does the quality of the videos they upload on the platform degrade? Why is there such a drastic change in its quality in your gallery and your handle?
If this question has been pestering you as well, we’re here with its answer. Stick with us till the end to understand more about videos and their quality on Instagram.
Why Do Instagram Videos Become Poor Quality After Upload?
Now, let’s discuss why there’s a noticeable degradation in the quality of the videos that you upload on Instagram. After all, there’s no visible difference in the quality of the photos uploaded there, right? Why is this problem specific to the videos, then?
Before we focus on the main problem here, let’s rule one possibility out first:
Does the video appear of poor quality only to you?
Upon uploading the video, did you check it yourself and find the quality faulty? Then there is a possibility that your internet connection is weak or poor. To confirm whether this is or isn’t a problem, you’ll need a second account or a second device to view said video once.
You could simply call up a friend and ask her to check if there is a glitch in the quality of the video you just uploaded. If there isn’t, perhaps you should restart your device’s internet and try checking again.
On the other hand, if there indeed seems to be a glitch visible on both parts, it’s time to proceed to our next possible reason and its solution.
How can you improve the quality of your videos on Instagram
Another reason why the quality of your video is poor on Instagram is that you haven’t turned on a certain setting on the platform that enables you to upload high-quality videos on Instagram.
Chances are, you might not even be aware of it so far. It’s a relatively new addition on Instagram, introduced in one of the latest updates. So, if you aren’t sure whether your mobile app has caught up to it, go to your Play Store/App Store and check for it.
Once you’re all set, follow the steps we’ve mentioned below to turn on this setting for your account:
Step 1: Launch the Instagram app on your smartphone by finding its icon from your device’s menu grid and giving it a tap.
As the app launches and you land on the Home tab, navigate a column of five icons arranged at the bottom of your screen; each of these icons are linked to a different tab.
Because you need to head to your Profile next, you’ll need to locate the right-most icon from this column; the one with the thumbnail of your profile picture.

When you find it, give it a tap.
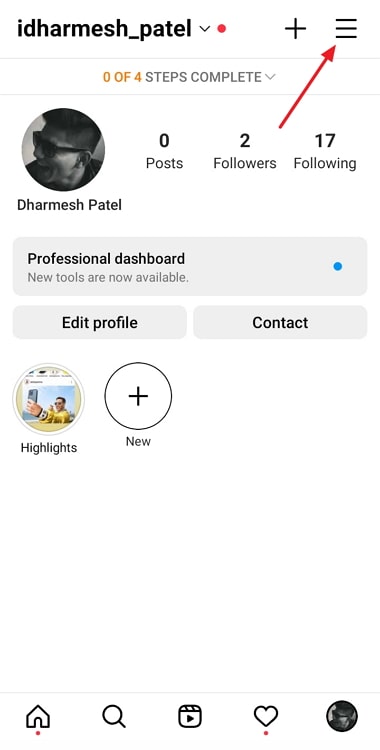
Step 2: As you arrive at your Profile, you’ll see your dp, followed by your username, bio, website link, the highlights section, and finally, your posts and reels.
At the top-right corner of your screen, you’ll find two icons – a Create button with a + sign on it, and a hamburger icon next to it.
Tap on the second icon here, and you’ll see a menu scrolling up your screen.
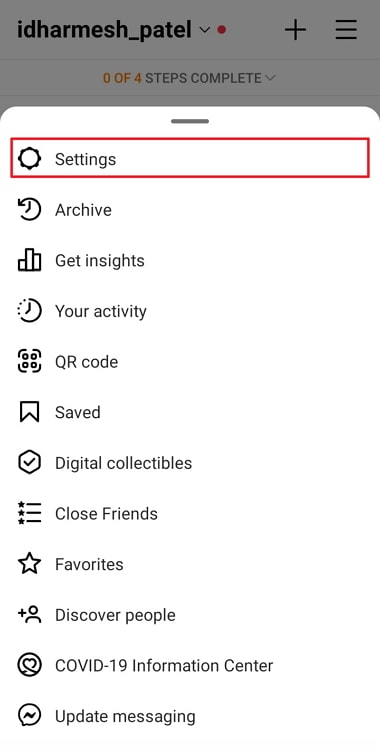
Step 3: The first option on this menu, with a black cogwheel drawn next to it, is of Settings. Give it a tap.
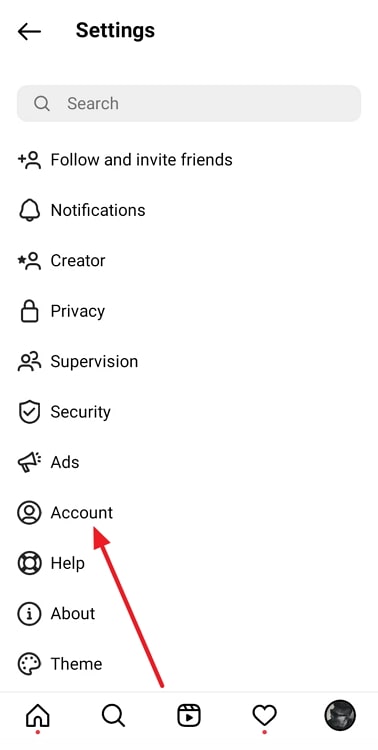
Step 4: As you land on the Settings tab, you’ll notice a search bar on top. In this bar, enter Account.
As Account turns up in the results that follow, give it a tap.
Step 5: You’ll be taken to the Account tab next, with all your account-related editable options listed below.
Scroll through this list until you find the Data usage option. As you find it, give it a tap.
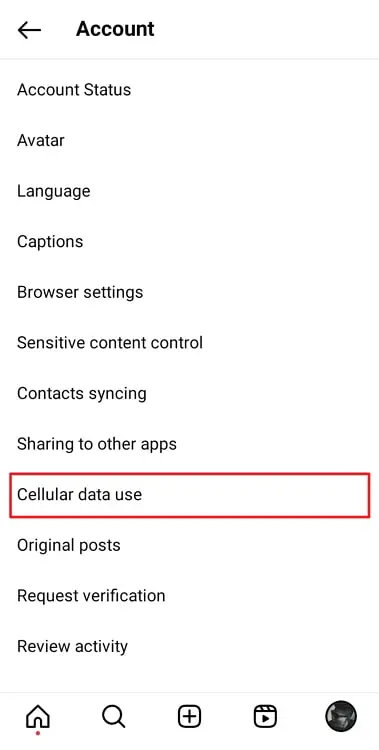
Step 6: On the last page you’re taken to, you’ll find two options, with toggle switches drawn next to both:
Use less mobile data
Upload at highest quality
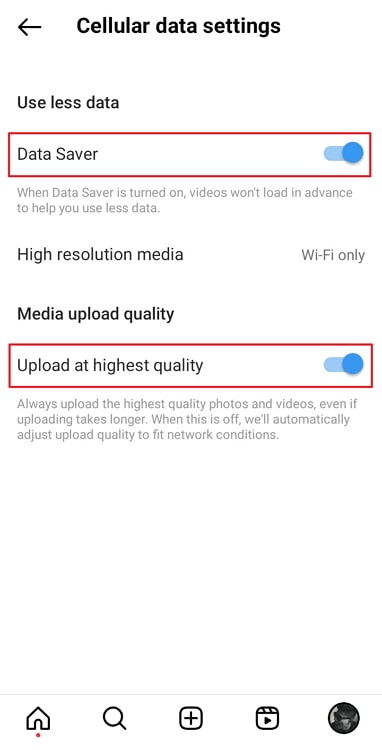
By default, both these toggle switches are turned off.
In order to be able to upload high-quality videos on Instagram in the future, all you need to do is turn on the toggle next to the second option. And that’s it!
Note: You must keep in mind that changing this setting on Instagram will have no impact on the videos that you have already uploaded in the past. It will only enhance the quality of the videos you upload moving forward, be it for your stories, posts, or reels.
The bottom line
As we approach the end of our blog, let’s go through a quick summary of our learnings from above.
Our topic of discussion today was the videos on Instagram, and how they were the to-go for the creatives of this era. Everyone – from gym enthusiasts and fashion influencers to doctors and writers – is creating videos on the platform.
Then, we proceeded to approach the issue at hand, which was the poor quality of videos on Instagram. Above, you’ll find a step-by-step guide that leads you to the setting of being able to upload high-quality videos on Instagram.
If there’s anything else you’d like our help with, feel free to tell us in the comments below!
Also Read:


 Bitcoin
  Ethereum
  Tether
  XRP
XRP  USDC
USDC  Wrapped SOL
  Lido Staked Ether
  TRON
TRON  Dogecoin